How to bypass the Plex Pass and Remote Watch Pass requirements for Plex remote access by using Tailscale
PermalinkUpdated
Beginning April 29th, 2025 the pricing for Plex Pass increased at the same time that remote access got paywalled behind it. Plex no longer allows streaming your own content outside of your home network without paying for Plex Pass, or the new Remote Watch Pass. You can bypass these paywalls, at least for now, by using Tailscale.
Table of Contents
[warning] Important
I have received confirmation from several people that remotely accessing Plex works with this setup without Plex Pass or Remote Watch Pass, at least for now — it’s entirely possible Plex will change something in the future to break this workaround. In fact, I would not be surprised if they do.
Please feel free to contact me and let me know if you have any issues, or even to let me know that it did work!
About Plex and the service changes
Plex Media Server is a self-hosted media server that lets you stream your owned (ripped, downloaded, or otherwise acquired) media from other devices on the same network, through a web-based GUI (access via browser) or dedicated app. (Say, on a smart TV or Roku device.) Plex lets you stream videos and music through a slick Netflix-like user interface, and Plex also offers the excellent Plexamp music player app for Android and iOS devices, so you can stream music on the go through a dedicated UI. Plex can also let you view photos, but this feature is nothing to write home about, in my opinion — stream movies and TV shows is Plex’s bread and butter, with built-in fetching of metadata, posters, etc.
Plex Media Server has a built-in feature called Remote Access that can be configured from the web UI. By enabling Remote Access, and forwarding network port 32400 from your router (ideally with some firewall rules for security), you can access Plex from other devices using your account, like a phone or tablet. It also allows you to share your media library externally with other users, allow them to access your server and stream the shared content. (This does not to work behind CGNAT, however, which is why I started using Tailscale for remote access and library sharing in the first place.)
The remote access feature, as well as sharing your library with friends, has always been free until the Plex service changes and price increases on April 29, 2025. From that day forward, remote access — by yourself and by others you’ve shared library with — is now locked behind Plex Pass. If you bought a Plex lifetime pass before that date it was $119, with occasional sales as low as $80, but after the change it now costs a whopping $250 for the lifetime pass. That’s a more than 100% increase on the base price!
The monthly Plex Pass subscription also rose from $4.99 to $6.99 per month, a less egregious price increase. However, keep this in mind — at the old prices, a lifetime pass of $120 was roughly equivalent to two years at $5/month, so it paid for itself after two years. With the new pricing structure, a $250 lifetime pass is roughly equivalent to three years at $7/month. No matter how you slice it, the value proposition is less than before.
So basically if you’re running a Plex server on your home network, a Plex Pass will be required both for accessing your own content from your own devices outside your network (remote access), and also for allowing other users to access shared library content. If you only care about sharing with others, each of those other accounts you’ve shared with can choose to pay for their own Remote Watch Pass subscription at $2.99, which will allow them to access your shared content without you, the owner of the Plex server, having to pay for Plex Pass. (Keep in mind that hardware transcoding has always been locked behind Plex Pass and this has not changed.)
About Tailscale
Tailscale is a mesh VPN service that lets you connect multiple devices across different networks seamlessly as if they were on the same network. Tailscale creates a Tailnet that all your devices will join as nodes, a coordination server facilitates NAT traversal to punch through firewalls, negating the need for port forwarding (technically safer than Plex’s built-in remote access), and exchanges encryption keys between devices. After the handshake it’s handed off to the individual nodes which are now directly connected to each other through encrypted WireGuard tunnels. Each node is directly connected to every other node, creating a mesh rather than a hub-and-spoke design — the coordination server is only ever involved to help reconnect nodes to each other and to propagate configuration changes. See how it all works here.
The Workaround
Per this comment on the Tailscale subreddit, you need to set up Tailscale on the Plex server as both subnet router and exit node, and set the external device you’re connecting with (phone, tablet, etc.) to use the Plex server as exit node. I have a lifetime Plex Pass and only use Tailscale to punch through CGNAT, so unfortunately I am unable to test this myself, though why the method works makes sense — by connecting to an exit node in the same network, you’re routing traffic from the remote device through the exit node, so it will appear to Plex as a local stream.
I have been told by many people that the below instructions have worked to allow them to remotely stream their own library without having a Plex Pass or Remote Watch Pass. I don’t know if it also allows external users to remotely stream a shared library, so please feel free to let me know if it does and I can credit you if you’d like!
Please make sure you follow the instructions below on how to setup the Plex server as both subnet router and exit node, since both are necessary and you must be connected to an exit node in your home network to access it remotely.
Pre-Requisites
This guide assumes you have a Plex server already set up and that it’s running on Linux. I won’t go into how to install Plex here, see this article for detailed instructions on running Plex as a Docker container in Linux.
Note that I use plain Linux to run Plex in a Docker container, there may be additional configuration needed to run Plex on Proxmox, TrueNAS, Synology, etc. I can’t help you with that, since I don’t run Plex on any of those and have no interest in doing so.
This post will instruct you on how to run Tailscale on the same machine running Plex, but alternately you can run Tailscale on a separate machine in your network and configure it as subnet router. I’ll provide instructions below to install and configure Tailscale on the same machine running Plex Media Server, but it’s identical if you prefer to do it on another machine, since we’ll be setting up subnet router as well as exit node.
I’ll also quickly explain installing Tailscale on other devices, specifically a Windows laptop and Android phone/tablet. (It should work similar on iOS, the apps look identical at least, but I don’t have an iOS device to confirm this myself.)
Set up Tailscale on Plex server
Go to the Tailscale website and create an account. This will create your Tailnet (private mesh network for all your Tailscale-connected devices) with your newly created account as the Owner and which you’ll manage through the web-based admin console.
Once you’ve got the account created, use the following command on the Plex server terminal to install Tailscale:
curl -fsSL https://tailscale.com/install.sh | sh
Once it’s finished installing, use the command sudo tailscale up and go to the provided URL and login to authenticate the node with your Tailscale account. You should then see the server listed under Machines in the Tailscale admin console, take note of it’s Tailscale IP address as you will need it soon.
Configuring the Plex server as subnet router and exit node
As explained at the top, it seems Plex remote access will not work without this. First, in order to use either subnet routing or exit node, you need to enable IP forwarding on the server. (This is straight from the Tailscale docs.)
If your machine has an /etc/sysctl.d directory (which most likely it does) then use these commands:
echo 'net.ipv4.ip_forward = 1' | sudo tee -a /etc/sysctl.d/99-tailscale.conf
echo 'net.ipv6.conf.all.forwarding = 1' | sudo tee -a /etc/sysctl.d/99-tailscale.conf
sudo sysctl -p /etc/sysctl.d/99-tailscale.conf
If your machine does NOT have the directory (ls /etc/sysctl.d returns No such file or directory) then instead use these commands:
echo 'net.ipv4.ip_forward = 1' | sudo tee -a /etc/sysctl.conf
echo 'net.ipv6.conf.all.forwarding = 1' | sudo tee -a /etc/sysctl.conf
sudo sysctl -p /etc/sysctl.conf
Also, if you are running firewalld on your server, you should allow masquerading with the following command:
sudo firewall-cmd --permanent --add-masquerade
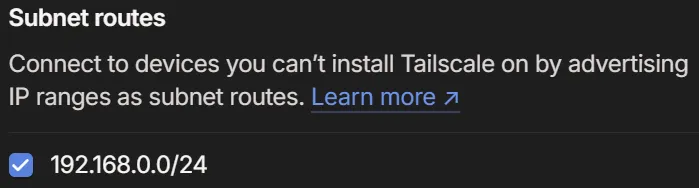
Now we’ll advertise both the subnet routes and the exit node with this command. Make sure to use the correct subnet for your LAN — if your Plex server’s local IP address is something like 192.168.0.100 then subnet will be 192.168.0.0/24, if it’s instead 192.168.1.100 then your subnet is 192.168.1.0/24, etc.
sudo tailscale up --advertise-routes=192.168.0.0/24 --advertise-exit-node
Now go to the admin console, on the Machines tab, and do the following:
Click the three dots to the right of the machine want you want to use as subnet router. (Notice the machine has
subnetsandexit nodebadges.)Choose Edit route settings… from the dropdown menu.
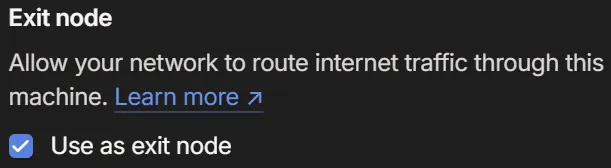
Click both checkboxes for Subnet routes and Use as exit node, then click the Save button to finish.
Configure the Plex server
The following will be necessary for Plex apps on phones, smart TVs, and other devices to connect through Tailscale and play content from your server.
Go to the Plex web UI of your server on a browser, and click on the the wrench icon at the top-right to go into Settings.
On the sidebar, scroll down to Settings section and click on Network.
Next to Secure connections, choose Preferred from the downdown menu.

- Make sure to leave disabled the checkbox for Enable Relay.

- This is the really important part. Under Custom server access URLs type in Plex’s server’s Tailscale IP, i.e.
http://100.80.225.40:32400. (Make sure to use http for this one, this is a fallback in case HTTPS does not work.) You can get the machine’s Tailscale IP from the admin console.

- Scroll down to the bottom of the page and click the Save changes button.
Set up Tailscale on a Windows Laptop and/or Android Phone
Now let’s install Tailscale other devices you want to access Plex from, I’ll walk you through installing and setting it up on Windows, Android, amd Linux, but for other clients go to the Tailscale admin console, click on the Add device button, and choose your client. Alternately just go to this link to see all the clients.
For Windows, go to this link, click the download button and follow the instructions on that page to set it up. You’ll be taken to login with Tailscale and authenticate the device, then you’re ready to go. When the Tailscale app is running and connected (you’ll see the Tailscale icon in your system tray), you’ll be connected to your tailnet — make sure to click on the Tailscale icon, hover over Exit nodes and choose your Plex server from the menu. (Side note, if you are watching Plex on Windows through the web UI, do yourself a favor and download the Windows app instead.)
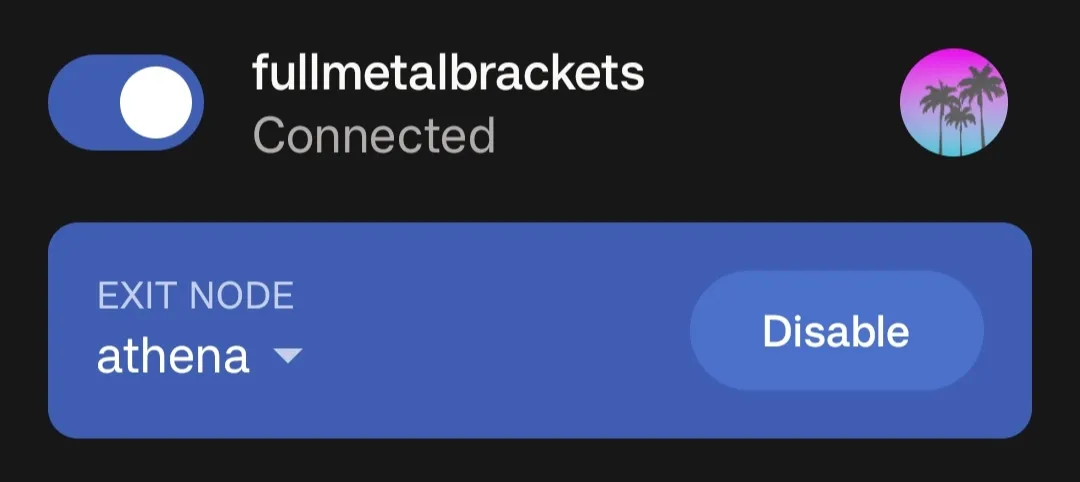
For Android-based devices (including Google TV), either go to this link and use the QR code, or just go to the Google Play Store and download the official Tailscale app. On an Amazon Fire TV, go to the Amazon Appstore. The app will be installed as a VPN, and when you login you’ll be taken to Tailscale to authenticate the device. You’ll use the Tailscale app to connect to your tailnet and to use the Plex server as exit node, tap the Exit Node button at the top and the Plex server should appear as an option — select it to enable the exit node, and all your device’s traffic will now be routed through the Plex server.
If you’re using a Linux device, there’s no GUI for Tailscale, instead to use the Plex server as exit node use the following command in a terminal: (Make sure to use the machine name of your Plex server, or the server’s Tailscale IP.)
sudo tailscale up --exit-node=plex
You should now be able to remote access Plex and stream your content when you are Connected on the Tailscale app and your Plex server is Enabled as exit node. See my example below: